
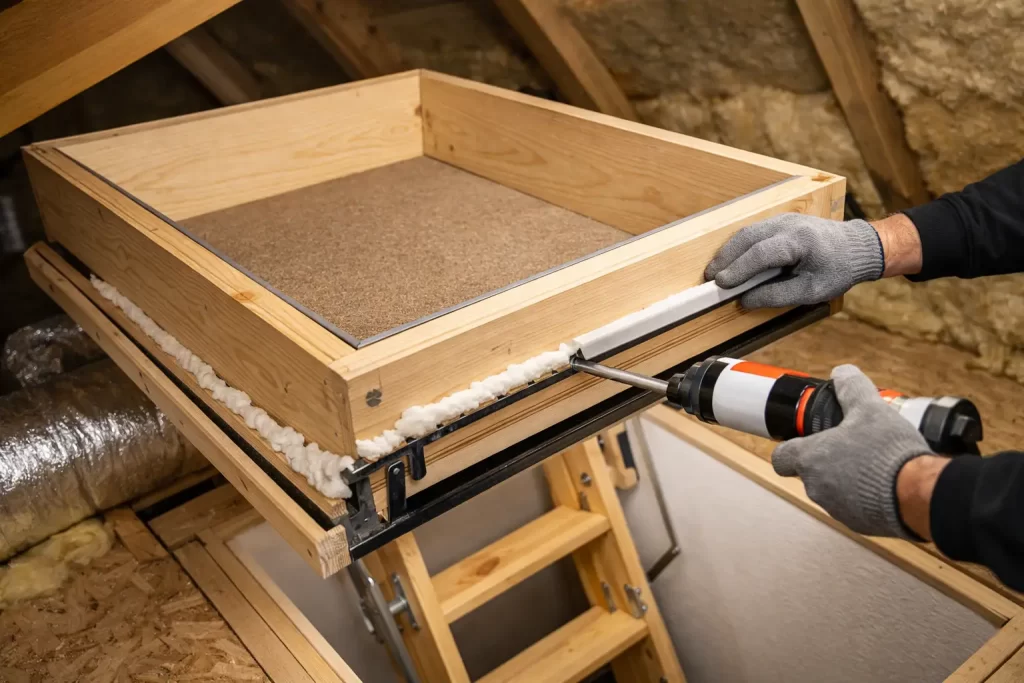
If the room below your attic always feels a little colder in winter or harder to cool in summer, the attic hatch is often the reason. Homeowners looking up how to seal attic hatch openings are usually dealing with the same problem – air leakage around a small opening that quietly wastes energy and makes the house less comfortable.
An attic hatch is easy to ignore because it is out of sight most of the time. But if it does not close tightly, it acts like a weak spot in the ceiling. Warm air rises and escapes into the attic in winter, and attic heat can push back into the living space in summer. Even a well-insulated attic floor can underperform if the hatch is loose, warped, or missing proper weather sealing.
The good news is that sealing it is usually straightforward. The better news is that the improvement is often noticeable right away.
Why attic hatches leak so much air
Most attic hatches were built for access first, not air sealing. A simple plywood panel or lightweight door might sit over the opening with small gaps at the edges. Those gaps may look minor, but moving air does not need much space.
The hatch can also leak for more than one reason at once. Sometimes the trim is uneven. Sometimes the hatch panel is slightly bowed. In other cases, there is no compression seal, so even a hatch that looks closed is not actually airtight. If insulation is missing from the top side of the hatch, you can also get a cold spot even after the air leak is reduced.
That is why a proper fix usually involves two parts – stopping the airflow around the perimeter and improving the insulation value of the hatch itself.
How to seal attic hatch without creating new problems
Before adding materials, check how the hatch currently works. Lift it open and close it a few times. Look for rubbing points, gaps, loose trim, cracked wood, or signs that the panel does not sit flat. If the opening is badly out of square or the hatch is damaged, weatherstripping alone may not give a lasting result.
For a basic seal, the usual approach is to apply adhesive-backed weatherstripping where the hatch compresses when closed. Foam tape is commonly used because it is inexpensive and simple to fit. Rubber weatherstripping can last longer, but it only works well if the hatch closes firmly enough to compress it.
Clean the contact surface first. Dust and attic debris reduce adhesion, and a dirty frame can cause tape to peel back early. Once the frame is clean and dry, place the weatherstripping in one continuous line around the opening where the hatch makes contact. Avoid stretching it as you apply it. Corners should meet tightly without gaps.
Then close the hatch and check the fit. This part matters. If the tape is too thin, you will still have leakage. If it is too thick, the hatch may not close fully, and the seal can fail just as badly. Sometimes it takes one adjustment to get the right compression.
Add insulation to the hatch panel
If the hatch itself is just a thin board, sealing the edge is only part of the job. You may still feel temperature transfer through the panel. Rigid foam board is a common solution because it adds insulation without much weight.
Cut the insulation to fit the top of the hatch neatly and secure it properly. Keep the edges tidy so it does not interfere with opening and closing. The goal is not to pile on as much insulation as possible. Too much weight can strain a basic hatch or make it awkward to use. A balanced approach usually works best.
For homeowners who use the attic regularly, the hatch still needs to be practical. A well-sealed hatch that is frustrating to lift every week is not a great result.
The materials that usually work best
If you are deciding what to buy, focus on fit rather than chasing the most expensive option. Closed-cell foam weatherstripping is often enough for light gaps and standard hatch frames. EPDM or rubber-based seals can be better for durability, especially where the hatch closes firmly and evenly.
For insulation, foil-faced rigid foam board is a popular choice because it is lightweight, easy to cut, and provides decent thermal resistance for the thickness. Some homeowners also build a simple insulated box over the attic opening on the attic side. That can help in colder conditions, but it takes more room and can get in the way if the attic access is used often.
Tape, caulk, and sealants can help around trim or fixed gaps, but they are not a substitute for a proper compression seal. If the hatch has to move, the sealing method needs to allow movement without tearing or losing contact.
When caulk helps and when it does not
Caulk is useful around the fixed frame, especially where trim meets drywall and there are visible cracks. It is not the right answer on the moving edge of the hatch. That area needs a gasket effect, not a hard seal.
This is where a lot of DIY jobs go wrong. Homeowners try to stop drafts with filler or heavy beads of caulk, and then the hatch sticks, cracks, or never closes properly again. Sealing should improve function, not fight against it.
Signs your attic hatch needs more than a simple seal
Some hatches are too poorly fitted for a quick upgrade. If the panel is warped, the frame is loose, or the opening was cut roughly, weatherstripping may only reduce the problem rather than solve it. The same applies if the hatch has no positive latch and simply rests in place by gravity.
A latch can make a real difference because it pulls the hatch tighter against the seal. Without that pressure, even good weatherstripping may not compress evenly. In some homes, replacing the hatch or upgrading to an insulated attic door gives a cleaner, longer-lasting result than trying to improve a basic panel.
This tends to matter more in homes where the attic is used for storage. If you are opening and closing the hatch often, the materials need to hold up. A quick patch may be fine for occasional access, but regular use calls for something more solid.
How to tell if the seal is working
Once the hatch is sealed, test it in simple ways. On a cold or windy day, stand below the hatch and feel for drafts around the edge. You can also look for signs such as reduced dust lines around the trim or a more even room temperature below.
If you want a clearer check, use a smoke pencil or even a thin strip of tissue near the hatch perimeter while the heating or cooling system is running. Movement shows air leakage. This is not a lab test, but it is a practical way to spot weak points.
What you should not expect is a miracle if the rest of the attic is under-insulated or full of other air leaks. The hatch is one part of the larger envelope. Sealing it helps, often a lot, but the full result depends on the condition of the surrounding attic area too.
How to seal attic hatch openings in older homes
Older homes can be less predictable. The ceiling opening may not be perfectly square, and the hatch frame may have shifted over time. In these cases, the best result often comes from correcting the carpentry first and sealing second.
That might mean adjusting the frame, replacing trim, adding a stop so the hatch seats properly, or fitting a better panel. The difference between a short-term fix and a proper one usually comes down to how well the hatch is built in the first place.
For busy homeowners, this is often the point where professional help makes sense. A specialist can tell quickly whether the hatch just needs new weatherstripping or whether a better access setup would solve the problem more effectively. Companies like AOS Attic Ladders & Flooring see this regularly because poor attic access and poor attic sealing often go hand in hand.
A better seal should still leave you with easy attic access
That balance matters. If the hatch is difficult to open, awkward to handle, or no longer sits safely after insulation is added, the job is not really finished. A proper attic hatch seal should reduce drafts and heat loss while still letting you get into the attic without hassle.
For some homes, that means a simple weatherstrip and insulated panel upgrade. For others, especially where the hatch is old or poorly fitted, replacement is the smarter choice. The right answer depends on the condition of the opening, how often you use it, and whether you want a quick improvement or a longer-term fix.
A well-sealed attic hatch is one of those small upgrades that pays off quietly. You notice it in the comfort of the room below, in fewer drafts, and in the feeling that the house is holding heat or cool air the way it should.